*This article is a machine translated and modified version of the following article.
https://actimeth.com/creativlog/car-configurator-template-tutorial/
I recently launched the “Car Configurator Template” on the Unreal Engine marketplace.
I also have a tutorial on YouTube that shows how to create a car configurator from scratch.
These two have some overlap in content, so by learning with the Car Configurator “Tutorial“, you can create almost the same configurator.
Therefore, I wrote about features and assets that are included in the Car Configurator “Template” but not covered in the Car Configurator “Tutorial“.
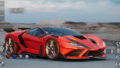
About the car model
The model of the car was a model with an original design created by HAMUKUN (@hamukun7arupaka). The Car Configurator “Template” is included in a set-up for ease of use with the Car Configurator.
What does setup mean specifically?
This includes removing invisible meshes, reducing the number of polygons, isolating objects and assigning materials in a way that makes them more manageable in UE4, combining same materials into a single mesh, and creating and assigning materials in UE4.
I think the inclusion of a car model is a big deal, since the above work takes up about half of the production time of a car configurator when done by hand (and even more time when modeling).
I will not be giving away this set-up model for free.
*Since the model itself is owned by Hamukun, as mentioned above, Hamukun may distribute the model before the setup.
Differences in Features
The following features are not covered in the tutorial, but are included in the Car Configurator “Template“.
- The car paint effect changes from front to back in a gradient
- Effect that changes the color of the wheel from the center of the wheel
- Change the FoV of the camera with the slider
- Using Child Blueprints to run around
- Cut scenes with sequencers
To close
I hope this will help you if you are thinking of buying Car Configurator “Template“.
As mentioned earlier, the Car Configurator “Template” includes a pre-setup model, so you can skip the time-consuming task of preparing a model of your car and proceed with the tutorial in the same way.
The blueprints in the Car Configurator “Template” and the blueprints introduced in the Car Configurator “Tutorial” are not completely the same, but if you have bought the Car Configurator “Template” but are not sure how it works, you should be able to understand and apply it, especially by watching the tutorial.
Why did I create the tutorial?
“Why make a similar tutorial for free when you’re selling content for a fee?” Some of you may think, “I don’t know what to do.
The reason is that if I was a student, I thought it would be hard to buy one at this price.
I started CG late, I didn’t have much time to get a job, so I spent my time studying and creating CG without doing much part-time work. So even though it was an investment in the future, it was difficult to buy expensive reference books, tutorials, assets, or even a PC.
So, with the option of buying paid content, I decided to take the approach that I would be happy and helpful if I were a student.
As far as pricing is concerned, the model of car used is HAMUKUN’s “original” and can be used commercially. So, I decided to set this price because I thought it would be worth this price even if it wasn’t a configurator.
If you can’t afford it or don’t have the time, you can buy the Car Configurator “Template” and learn efficiently.